Friday, July 30, 2010

Pasta with Roasted Garlic, Chicken, and Brocolli with a White Cheddar & Wine Sauce


Okay, I admit it - 99% of the time, when a recipe calls for garlic of any sort, I will be using my giant jar of minced garlic.  I just like how the garlic is minced up into really small equal pieces, and all I have to do is scoop it out of the jar.  After coming across this recipe on Annie's Eats, I decided it was time for me to use some "real" garlic to make this dish.  It seemed like the roasted garlic was an integral part of the flavor, and Annie had some very simple directions on roasting the garlic so when I went to the grocery store I bought 2 heads of garlic for the first time in a very long time.

As it turns out, I have been missing out on lots of garlicky flavor!  Roasting the garlic hardly took any effort at all, and it added flavor that cannot be achieved by using store-bought minced garlic.  I think I might be converted!  I'm not going to say that I won't be using jarred garlic at all anymore, but I think now it'll be more like 50/50 instead of 99/1. 

Anyways, this dish was delicious!  It has several different elements that all come together to make a great meal.  It's light and flavorful, and it is definitely going on my repeat list.  The quantities below will serve 2 hungry people, but if I ever make this for four people, I will go ahead and double it.

Ingredients:

8 oz. tube shaped pasta, such as penne
1½ tbsp. butter
¼ cup roasted garlic paste*
1½ tbsp. flour
¼ cup dry white wine (as usual, I used Savignon Blanc)
1 cup low-sodium chicken broth
1 cup shredded white cheddar cheese (sharp is best!)
1 head of broccoli, cut into florets and blanched until crisp-tender*
1 boneless, skinless chicken breast, grilled and cut into bite size pieces (you can also bake or saute this)
Salt and pepper, to taste

*To make roasted garlic paste, peel the outer papery skins off two heads of garlic, leaving the heads still intact. Slice about a quarter off the top of each head so that all of the cloves are partly exposed. Wrap the heads in foil and bake at 350˚ F for one hour. Remove from the oven and let cool. Once cool enough to touch, squeeze the garlic cloves out of the peels and smash with a fork to make roasted garlic paste.

*I just boiled the broccoli florets for 5 minutes and set them aside until I was ready to add them in, but you could also steam them.

Directions:
 
Bring a large pot of salted water to boil. Cook the pasta until al dente according to the package directions.

Meanwhile, in a large skillet or saucepan set over medium heat, melt the butter. Once the butter is melted, whisk in the roasted garlic paste and cook just until fragrant, 30-60 seconds. Whisk the flour into the mixture and cook, stirring constantly, until the mixture begins to turn golden brown, 1-2 minutes. Stir the white wine and broth into the pan. Bring to a simmer and cook, stirring frequently, until slightly thickened, about 2 minutes. Whisk in the cheddar and stir until melted. Season the sauce with salt and pepper to taste.

Mix in the broccoli florets and chicken pieces, and cook just until heated through. Mix in the cooked pasta until evenly coated with the sauce. Serve warm.

Wednesday, July 28, 2010

Roasted Banana Cinnamon Rolls


Even though I'm not a huge breakfast person, I do love to make something good for breakfast on at least one day of the weekend.  My biggest dilemma when deciding what to eat for breakfast is whether to go with sweet or savory.  Do I have some french toast or an omelette?  Do I have waffles with some kind of sweet topping or eggs benedict?  What a tough choice!

As soon as I saw this recipe on Picky Palate, I knew that I wouldn't be having the sweet or savory dilemma in my head during the upcoming weekend because I had to make this right away!  I absolutely love bananas (in the past, I have really enjoyed these bananas foster waffles for breakfast), and I had never even thought about how good they would be combined with cinnamon rolls, but this combination of bananas and brown sugar with cinnamon rolls sounded amazing to me.

These did take a little longer to make than I expected (since you first roast the bananas then assemble and bake the cinnamon rolls, this will take you over an hour), but it was worth it.  The flavor was incredible and this combination tasted just as good as I imagined it would be!  I'll definitely be making these again sometime.

Ingredients:

3 ripe bananas cut into 1/4 inch slices
1 tablespoon butter, cut into small pieces
2 tablespoons brown sugar
1 roll Pillsbury Crescents (the original recipe called for Pillsbury French Bread Loaf, but these Pillsbury Crescents worked well for me or you could also use homemade dough)
4 tablespoons softened butter
3/4 cup brown sugar
1 1/2 tablespoons ground cinnamon
1 cup powdered sugar
3-4 tablespoons heavy cream

Directions:

Preheat oven to 425 degrees F. Place banana slices and cut up pieces of butter into a small baking dish. Sprinkle with brown sugar and bake for 25 minutes or until golden and bubbly. Remove and let cool for 10 minutes. Next, use a fork to smash roasted bananas until well combined.

Reduce heat to 350 degrees F. Unroll Pillsbury Crescent dough - do not tear crescents apart.  Press perforations together to seal so that the douugh is one large rectangle. Spread with softened butter and sprinkle with brown sugar and cinnamon. Place dollops of roasted banana mixture evenly over top. Starting from long end, roll up into log shape. Using a sharp knife, cut 1-2 inch slices and place onto a silpat or parchment lined baking sheet. Bake for 25-30 minutes or until just turning golden brown. Remove and let cool for 10 minutes.

Whisk powdered sugar and heavy cream until combined; drizzle over top of warm rolls.

Tuesday, July 27, 2010

Turkey Burgers


Let me start this off by saying that before I made this recipe, I had never ever eaten a turkey burger before.  I love beef burgers, and I just thought that turkey burgers would taste somewhat burger-like, but definitely sub-par. 

I finally decided to give turkey burgers a try because I'm trying to make myself cook and eat a little healthier (but not healthy enough that I didn't load these babies with some gooey, melty cheese!), and I'm glad I got past my preconcieved notions because these were great!  I'm not saying that I won't be enjoying the occasional beef burger going forward, but I will definitely be making more turkey burgers in the future.

Ingredients:

Turkey Burgers-
1 (1.25 lb) package of ground turkey
1 egg, slightly beaten
1/4 cup italian seasoned bread crumbs
1 1/2 tablespoons worstershire sauce
2 teaspoons minced garlic
Salt, pepper & hamburger seasoning, to taste (I used about 1/2 teaspoon of each)

For Cooking Burgers-
Non-stick cooking spray

For Serving-
4 hamburger buns, lightly toasted
Sharp white cheddar cheese, or any good sharp cheese
1 small red onion, sliced and sauted with some EVOO until softened
Ketchup & mustard, to taste

Directions:

In a large bowl, mix together all of the turkey burger ingredients (it works best to use your hands to do this).  Refrigerate for about 10 mintutes (I did this so that the meat mixture wasn't too sticky), then form until 4 hamburger patties (if you want, you can refrigerate again at this point if your patties are too sticky after handling them).

Heat a gas grill to medium-high heat, and spray the grates with some non-stick cooking spray.  Cook burgers for 5-6 minutes on each side, until cooked all the way through.  On the last couple minutes of cooking, place cheese on top to melt.  Serve on hamburger buns with sauteed red onions and the hamburger condiments of your choice.

Sunday, July 25, 2010

Cheesecake Stuffed Strawberries


There are three main food-related things that I look forward to every summer.  First - summer tomatoes.  They are so much more flavorful than when you buy them in the winter, and they taste even better when you grow them in your own garden!  Second - peaches.  There is nothing better than enjoying a sweet, ripe summer peach on a hot summer day....I will take peaches over watermelon any time!  Third - strawberries.  Sure you can get decent strawberries year-round, but I just feel like strawberries taste sweeter (and better) during the summer months. 

Anyways, this summer is flying by, and I think strawberries have been on my grocery list almost every week for the past couple of months.  While they are delicious on their own, I wanted to use them to make some kind of simple dessert for my family to enjoy while we were at the lake a few weeks ago.  I thought about making some chocolate covered strawberries, but ehhh....I've done that before and wanted something new.

After searching the internet for ideas, I found a winner!  When I saw a recipe for cheesecake stuffed strawberries on The Novice Chef blog (which happens to be a fabulous cooking blog), I knew that I had to make these.  Strawberries and cheesecake go together perfectly, and I knew these would be super good.  Well, they were amazing, and they are such a great idea - try these!

Ingredients:

2 crates of fresh strawberries
1 box of Jello No-Bake Cheesecake, prepared using box directions (basically just beat a cup and a half of milk with the cheesecake mix using an electric mixer for a few minutes - you can also use your own homemade cheesecake filling, but this was super quick and delicious)
Crushed graham cracker crumbs (if you use the Jello No-Bake Cheesecake, graham cracker crumbs are included, and I just used those)

Directions:

First, wash your strawberries and cut off the tops.  Hollow out the inside of the strawberries so that there is some room for the cheesecake filling (I used the tip of a potato peeler for this, but you could also just use a small paring knive). 

Put your prepared cheesecake filling into a large ziploc bag (you could use a pastry bag for this, but I don't have those so ziplocs work perfectly fine).  Cut the tip off one of the corners of the ziploc bag, and squeeze out the cheesecake filling to fill the inside of each strawberry until it is slightly overflowing.

Last, dip the top of each strawberry into the graham cracker crumbs.

You can definitely make these a little bit in advance, but don't make them more than 24 hours in advance or they will be a little bit soggy.  I made these around lunchtime, and they tasted perfect when we had them for dessert after eating dinner that night.  I liked them so much, I made them again for a family party we hosted a couple weeks later :)

Saturday, July 24, 2010

Homemade Frosty Paws - Windy's Favorite Summer Dog Treat!


Last summer, I discovered these great little frozen dog treats called Frosty Paws.  I bought them a few times for our sweet doggie, Windy (and she loved them!), but I decided to try and make these at home since they are kind of pricey at my grocery store.  Luckily, Windy loved my homemade version just as much as the store bought ones so I've made these for her a few times. 

It's been hot and muggy here in Chicago lately, so I decided it was time to make another batch of these for Windy.  She loves enjoying her doggie ice cream after a long walk in the heat :)  Here's how to make some homemade frosty paws treats for your doggie:

Ingredients:

1 (32 oz.) container of low-fat vanilla yogurt
2 bananas
2 tablespoons peanut butter
2 tablespoons honey

Directions:

Mix all ingredients together in your blender.  Divide amongst some small, plastic cups and freeze.  You could also freeze in ice cube trays for smaller treats, but Windy's a big girl so I divided the above recipe into 9 plastic cups:


Look at how cute Windy is!  I'm such a proud mom :)  She is waiting for me to give her some doggie ice cream.


When I serve these to her, I usually put them in the microwave for about 20 seconds just to soften a bit (this makes it easier to get the frosty paws treat out of the cup).  She is a happy girl when she gets some frosty paws!

Friday, July 23, 2010

Cookies & Cream Cupcakes


I love making cupcakes for get togethers.  I think that it's a lot easier to make individual desserts so that you don't have to worry about cutting cake or pie into individual servings when you have company over.  Cupcakes can be a little difficult to transport unless you have a cupcake holder, but I served these at a family party that we were hosting at our condo so I didn't have to worry about that this time.  I did invest $25 in this cupcake carrier, and it has worked well for me in the past when I was bringing cupcakes to a party (which I love to do because you can do so many fun things with cupcakes!).

I searched for the perfect cupcake recipe to serve at our party, and I came across this recipe from Annie's Eats that she had adapted from Beantown Baker.  Anything oreo is usually a hit, (which is why I love to bring oreo truffles to parties) and these cupcakes looked perfect so I decided to make them the morning of our party.  These were really tasty and a perfect dessert to serve to celebrate a few birthdays!  Just as a warning for when you're buying the ingredients - I used a whole package of oreos plus a row of oreos from a second package....so I'm glad I ended up buying two packages of oreos.  This recipe will make 24 delicious cupcakes.

Ingredients:

For the cupcakes-
24 Oreo halves, with cream filling attached
2¼ cups all-purpose flour
1 tsp. baking powder
½ tsp. salt
8 tbsp. unsalted butter, at room temperature
1 2/3 cup sugar
3 large egg whites, at room temperature
2 tsp. vanilla extract
1 cup milk
20 Oreo cookies, coarsely chopped (I cut each oreo into quarters)

For the frosting-
8 oz. cream cheese, at room temperature
6 tbsp. unsalted butter, at room temperature
1 tbsp. vanilla extract
4 cups confectioners’ sugar, sifted
2 tbsp. heavy cream

For garnish-
Oreo cookie crumbs
24 Oreo cookie halves

Directions:

Preheat the oven to 350˚ F.  Line the wells of two cupcake pans with 24 paper liners. Place an Oreo halve in the bottom of each liner, cream side up.


In a medium bowl, whisk together the flour, baking powder and salt and set aside.  In the bowl of an electric mixer, combine the butter and sugar and beat together on medium-high speed until light and fluffy, about 2 minutes. Blend in the egg whites one at a time, beating well after each addition. Blend in the vanilla extract.  With the mixer on low speed, beat in half of the dry ingredients just until incorporated.  Add the milk and beat just until combined, then mix in the remaining dry ingredients.  Gently fold in the chopped Oreos with a rubber spatula until evenly incorporated, being careful not to over-mix.

Evenly divide the batter between the prepared cupcake liners.


Bake for 18-20 minutes, rotating the pans halfway through baking, until a toothpick inserted in the center comes out clean.  Allow to cool in the pans 5-10 minutes, then transfer to a wire rack to cool completely.

To make the frosting, combine the cream cheese and butter in the bowl of an electric mixer and beat on medium-high speed until smooth, about 1 minute.  Blend in the vanilla extract.  Beat in the confectioners’ sugar until incorporated and smooth, 1-2 minutes.  Add the heavy cream to the bowl and beat on medium-low speed just until incorporated, then increase the speed to medium-high and whip for 4 minutes until light and fluffy, scraping down the sides of the bowl as needed.

Frost the cooled cupcakes as desired.  Sprinkle with Oreo crumbs and garnish with Oreo halves.


If you are an oreo fan, you will love these!  I loved the oreo cookie at the bottom of the cupcake, and this frosting really went perfectly with the cupcake.  I highly recommend these :)


Thursday, July 22, 2010

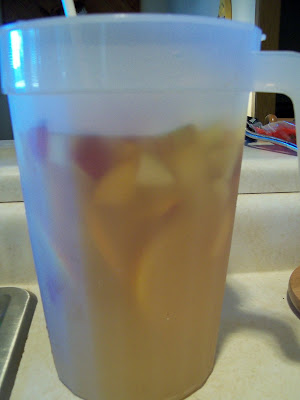
White Wine Peach Sangria


I loooooove sangria!  Drinking it reminds me of being in Barcelona, strolling down Las Ramblas and stopping for some tapas and sangria al fresco.  Man, I miss my college days!  I was lucky enough to backpack through Europe for a month with my little sister when I was twenty years old, and Barcelona was a 4 day stop for us.  In addition to the tapas and sangria, we saw the beautiful Mediterranean Sea, went on a biking tour to see all of the historical sites, and partied until 6 in the morning.

Even though it's been more than five years since I visited Spain, I still love to get sangria whenever I'm eating tapas at my favorite tapas place here in Chicago, Cafe Ba Ba Reeba.  I decided I wanted to make some sangria at home.  This recipe from Bobby Flay is so good that I made it twice this month.  It has a great flavor and is very similiar to one of the white wine sangrias that I order from Cafe Be Ba Reeba.

Ingredients:

1 bottle white wine (I just used Savignon Blanc)
3 ounces brandy
2 ounces triple sec
1 cup orange juice
1 cup pineapple juice
2 ounces simple syrup (equal parts sugar and water brought to a boil for 2 minutes in a small saucepan) and cooled (leftover syrup can be stored in a tightly sealed container in the refrigerator for 1 month)
3 ounces white peach puree (peel peaches, remove pit and puree in a blender with a small amount of water - BUT, I just bought some peach nectar from the grocery store and used that instead)
Fresh peaches, oranges, and apples sliced

Directions:

Place all ingredients in a pitcher and stir to mix. Refrigerate at least 8 hours or up to 48 hours. Serve over ice.  This recipe will make 1 small pitcher.  The first time I made this, I wanted to make a big pitcher so I doubled the recipe:


The second time I made this recipe, I made it for a family party and wanted to make sure we had a bunch so I tripled it:


This is a delicious white wine sangria!  I highly recommend it :)

Friday, July 16, 2010

Island Shrimp and Pineapple Skewers with a Rum Butter Sauce


My favorite tropical place to visit on vacation is probably anywhere in the Caribbean.  I've visited various Caribbean islands quite a few times in my life, but something about the islands makes me want to come back over and over.  This meal definitely made me wish that I was sitting on a beach in the Caribbean eating these shrimp and pineapple skewers while watching the waves crash in and listening to a calypso band.  Unfortunately, I don't think we'll be able to go on a tropical vacation in 2010, but eating this meal by the lake (of the Ozarks) while sipping on a pina colada wasn't half bad.

My mom made this great meal for us (my dad did the grilling part), and I was very impressed with how it turned out.  I loved the combination of the shrimp, prosciutto, pineapple, and rum butter sauce.  It was a little time consuming to make, but I will definitely be making this recipe sometime this summer on a weekend night so that we can enjoy it out on our patio with a tropical drink and pretend we're in the Caribbean.

This is an Emeril recipe.  We served the skewers over some coconut rice (that went perfectly with the skewers), and we had fruit salad on the side.  What a great summer meal!


Ingredients:

2 tablespoons fresh lime juice
2 tablespoons olive oil
2 teaspoons minced fresh gingerroot, plus 2 teaspoons
2 teaspoons minced garlic
1 teaspoon red pepper flakes
16 large raw shrimp, shelled and deveined (we grilled up a few extra shrimp)
1/3 pound sliced prosciutto
1 small pineapple, peeled, cored, and cut into 1-inch cubes
2 tablespoons minced shallots
1/2 cup dark rum (we used Meyer's)
6 ounces (1 1/2 sticks or 12 tablespoons) cold unsalted butter, cut into pieces
1/4 teaspoon salt
1/8 teaspoon cayenne
1/2 cup minced fresh cilantro
 
Directions:
 
Preheat a grill to medium heat.
 
In a bowl, combine the lime juice, oil, 2 teaspoons of the ginger, garlic, and pepper flakes. Add the shrimp and pineapple chunks, toss to combine, and let marinate while the grill heats, about 15 minutes. Remove from the marinade.

Wrap the shrimp with the prosciutto. Alternately, thread the pineapple chunks and the wrapped shrimp onto metal or bamboo skewers. Grill until the shrimp are cooked through and the pineapple chunks are marked, 3 to 4 minutes per side. Remove from the grill. (Alternately, the skewers can be cooked under the broiler, turning as necessary to cook evenly and avoid burning.)

Make the sauce in a medium saucepan by combining the rum, shallots, and remaining 2 teaspoons of minced ginger. Bring to a boil. Reduce the heat and simmer until reduced to 3 tablespoons in volume, 3 to 4 minutes. With the heat on medium-low, whisk in the butter, 1 tablespoon at a time, adding each piece before the previous one has been completely incorporated. Continue until all the butter is incorporated and the sauce coats the back of a spoon, removing the pan from the heat periodically to prevent the sauce from getting too hot and breaking. Season with the salt and cayenne, and stir. Remove from the heat and transfer to a decorative bowl.

To serve, transfer the wrapped shrimp and pineapple chunks from the skewers to a platter. Sprinkle with the cilantro and serve with the rum butter sauce (we actually served the skewers on top of some coconut rice and then sprinkled everything with the rum butter sauce and cilantro).

Wednesday, July 14, 2010

Grilled Jerk Chicken Sandwiches


To be honest, I'm not a huge fan of boneless, skinless chicken breast.  Actually, I take that back - I love using boneless, skinless chicken breasts if I get to bread and fry them, like if I'm making something like parmesan chicken or sweet and sour chicken, but grilled boneless, skinless chicken breasts can end up being dry, flavorless, and boring.

With that being said, Kevin and I wanted to grill up something semi-healthy on our first night at the lake this past week, so we decided to make some sort of grilled chicken sandwich.  I needed something to kick up the flavor on these grilled chicken sandwiches.....and I found it - mango chutney!  We love anything with mango in it so I decided to give this mango chutney that I found in the Indian section of my grocery store a try.  This sandwich was definitely a winning combination :)  We will be making this again for a healthy meal (although I just can't bring myself to give up the cheese which would make it a bit healthier). 

Ingredients: (to make 2 sandwiches - adjust as needed)

2 boneless, skinless chicken breast halves, butterflied and pounded out a bit (just to thin and even out a bit so the breasts aren't super thick - I always do this so that the chicken cooks evenly and doesn't get dried out)
2 hamburger type buns
2 slices of pepperjack cheese
1/2 of a medium-sized red onion
EVOO
1/4 cup mango chutney (I found this in the Indian section of my grocery store)
Caribbean jerk seasoning, to taste
Salt & fresh cracked pepper, to taste

Directions:

Slice up the red onion and saute with a little EVOO, salt, and pepper in a skillet until softened. 

Meanwhile, season the chicken breasts with jerk seasoning and salt & pepper, to taste.  Grill until cooked through (we grilled them for maybe 10-12 minutes, but it depends on your grill and how thick the chicken breasts are). 

Add cheese slices to the chicken about a minute or two before they are ready to come off of the grill.  Assemble sandwiches and divide mango chutney and sauteed onions between the sandwiches.

Monday, July 12, 2010

Bananas Foster


There are only four ingredients in this AMAZINGLY YUMMY recipe - bananas, butter, brown sugar, and dark rum....this is so easy to make, but in my opinion, it is definitely restaurant quality.  I absolutely love bananas, and I have been making this recipe for a few years now.  I don't repeat very many dessert recipes over and over because I like to try new recipes, but this is definitely one that keeps getting repeated in our house.

I spent the past week at my grandparents' lakehouse, and since Kevin and I arrived a day before my parents, we decided to greet them with this dessert upon their arrival.  I always serve bananas foster over a couple of scoops of vanilla ice cream (and this time we had some whipped cream in the fridge so we added a little of that on top as well).  I usually pour the bananas foster to the side of the ice cream instead of directly on top so that the ice cream doesn't melt as fast.  It was no surprise that this dessert was a big hit!

The bananas foster recipe that I always use is from Paula Deen, and I've also used it in the past to serve over waffles for a special occasion breakfast (so good!).  Give this recipe a try!  It's incredible :)

Ingredients:

1 stick of butter
1/2 cup brown sugar (either light or dark will work)
4 bananas, peeled and cut lengthwise and into thirds
1/4 cup dark rum (I use Meyer's)

Vanilla Ice Cream - For Serving

Directions:

Melt butter in a large skillet. Add brown sugar and stir together. Add the bananas and cook until caramelized over medium-high heat (about 2-3 minutes). Pour in the rum and catch a flame off of the gas stove or a BBQ lighter (I always use an aim-a-flame). Stand back when ignited and flambe. Be careful; a flame will shoot up above the pan. Let flame die down.


Serve over vanilla ice cream and/or a slice of pound cake.  I always serve this over ice cream because the mix of hot and cold is so good and I love the way the bananas foster goes with the ice cream.  A little whipped cream on top won't hurt :)

Wednesday, July 7, 2010

Crabbies


I've had my eye on Paula Deen's "crabbies" recipe for awhile.  I love both crab and cheese, and I saw her make these on one of her shows and I knew I wanted to try these out sometime.  Luckily, I had some frozen leftover king crab meat that I wanted to use up.  I had been planning on making seafood enchiladas with these leftovers, but then I remembered these crabbies, and they seemed really easy to make so I decided to make these instead for us to eat on the 4th of July as an appetizer to go with our smoked ribs.

Did I mention that king crab legs are probably my favorite food?  Yes, I like crab legs much better than lobster (although I definitely won't turn down a lobster dinner either!).  I love the sweetness and flavor of the crab meat, and I like the texture better than lobster or shrimp.  Whenever I buy king crab to make at home, I buy a pound and a half per person and make steamed crab legs with some garlic butter for dipping (I'm getting hungry just thinking about this right now).  Then, if we have any leftovers, I will get all of the meat out of the shells and freeze for later.

So I had the crab meat already, plus I had most of the other ingredients on hand, but when I went to the grocery store I needed to get a jar of Kraft Old English Cheese Spread that the recipe calls for.  I actually worked at Kraft Foods for over two and a half years (I used to work in finance and accounting), and I still remember exactly where they kept the Old English in the company store that I visited at least once each day to break up the work day, but I couldn't find it at my grocery store so instead I bought an 8 ounce container of Kaukauna cheese spread (I bought the sharp cheddar lite flavor) which worked out great. 

This recipe is courtesy of Paula Deen, but I did adjust it a bit so below is the recipe I made which turned out really yummy.  I will totally be making these again whenever I have some leftover king crab meat.  These are also great to keep in the freezer because all you have to do is pop them in the oven for 15 minutes and you'll have some great appetizers ready to go!

Ingredients:

1 1/2 cups chopped crab meat (Paula Deen's recipe says to use 8 ounces good white crabmeat)
1 (8 ounce) jar Kaukauna lite cheddar cheese spread (Paula's recommends a 5 oz. jar of Kraft Old English....I think any cheddar cheese spread would work with this recipe)
2 tablespoons mayonnaise
1/2 teaspoon garlic powder
1/2 teaspoon Old Bay Seasoning
1 stick of butter, softenened (did you expect any less butter in a Paula Deen recipe?)
Dash hot sauce or cayenne pepper (I used Frank's Red Hot Sauce)
12 english muffin halves, toasted (I just toasted these in my toaster for a few minutes before spreading the crab mixture on top)
Chopped Chives, for garnish (Paula uses Italian Parsley)

Directions:

Preheat oven to 425 degrees F.

In a large bowl, combine crab, cheese spread, mayonnaise, garlic powder, old bay seasoning, butter and hot sauce. Divide mixture evenly over bread rounds and spread. Stick these in the freezer for about 15 minutes to harden (you don't have to do this, but it makes them easier to cut into wedges).  Cut each round into quarters and place on a greased baking sheet (if freezing, do so at this point and add a few extra minutes when baking later on). Bake until topping is heated through and golden brown on top, about 10 to 15 minutes.

Sprinkle with chives. Serve hot.

Monday, July 5, 2010

Mai Tais


I love Mai Tais, but I've never actually made them at home before.  They were actually one of the signature cocktails at Kevin and my wedding reception (along with mojitos) so I decided to look through a few recipes to figure out how to make them.  The Mai Tais turned out really yummy, and I will definitely be using this recipe again.  These would be great for a party since you can make a big pitcher instead of having to mix individual drinks, plus you can make them a few hours before the party starts.

The recipe below made one small pitcher of Mai Tais.  If you want to make a large pitcher of this, I would double the recipe.  Here's a picture of the pitcher that this recipe made to give you an idea of how much it is (it's in one of those pitchers with a hole from Crate and Barrel):


Ingredients:

2 cups pineapple juice
2 cups orange juice
2/3 cup coconut rum (we used Parrot Bay)
2/3 cup dark rum (we used Meyer's)
juice from 2 limes
splash of grenadine (probably a couple of tablespoons)

Directions:

Mix all of the ingredients together in a pitcher and serve over ice (you can also make this ahead of time).

Sunday, July 4, 2010

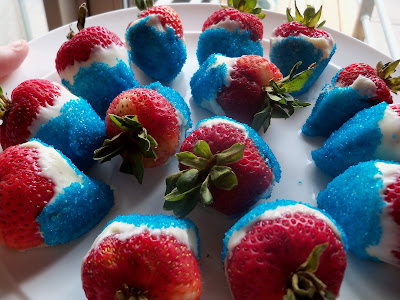
Happy 4th of July! - Red White & Blue Strawberries


Happy 4th of July!  The day is almost over, but I wanted to do a quick post with my red, white, and blue strawberries that I made to celebrate the USA :)  These were super easy to make (just dip strawberries in melted white chocolate and then dip in blue colored sugar). I was a little bit sloppy with my dipping since I was just making these for Kevin and me, but these were super quick and easy and you can't go wrong with chocolate covered strawberries.

I hope everyone is enjoying their 4th of July!  We will be celebrating some more during this week because we are heading to the Lake of the Ozarks (a huge lake in Missouri where my grandparents have a lake house) for some relaxation, and we'll definitely have to set off some fireworks since it's illegal to do it here in Chicago (although I heard fireworks galore when we sat out on our deck a little bit ago).  Anyways, thank you to all those brave people who fought for our freedom and thanks to those who are doing so right now!  Happy 4th!

Blueberry Muffins


These may not be the prettiest blueberry muffins (and I apologize for the really bad picture), but they tasted great!  This recipe is from Ina Garten, and her recipes never disappoint.  Even though these didn't have the nice, pretty, rounded muffin tops, they had a great flavor and texture.  The sweetness of the batter balanced out the tartness of the blueberries perfectly.

We had these muffins for Sunday brunch a few weekends ago, and then we snacked on them for a few days afterwards.  I will definitely be making this recipe again.  Next time, I might add a little lemon zest to the batter.

Ingredients:

12 tablespoons (1 1/2 sticks) unsalted butter, at room temperature (I know, I know, this is a lot of butter)
1 1/2 cups sugar
3 extra-large eggs, at room temperature
1 1/2 teaspoons pure vanilla extract (I used 2 teaspoons, I always like a little extra vanilla)
8 ounces (about 1 cup) sour cream (don't skip this!  It makes the texture perfect)
1/4 cup milk
2 1/2 cups all-purpose flour
2 teaspoons baking powder
1/2 teaspoon baking soda
1/2 teaspoon kosher salt
2 half-pints fresh blueberries, picked through for stems

Directions:

Preheat the oven to 350 degrees.  Place 16 paper liners in muffin pans.

In the bowl of an electric mixer fitted with the paddle attachment, cream the butter and sugar until light and fluffy, about 5 minutes.  With the mixer on low speed, add the eggs 1 at a time, then add the vanilla, sour cream, and milk.  In a separate bowl, sift together the flour, baking powder, baking soda, and salt (I was too lazy to sift). With the mixer on low speed add the flour mixture to the batter and beat until just mixed. Fold in the blueberries with a spatula and be sure the batter is completely mixed.

Scoop the batter into the prepared muffin pans, filling each cup just over the top, and bake for 25 to 30 minutes, until the muffins are lightly browned on top and a cake tester comes out clean.

I was hesitant to fill the muffin cups over the top with batter, but follow the directions and do this because these muffins don't rise like most do.  They will have a flat muffin top, which might not be as pretty but once you bite into these you'll forget about the flat tops because they taste great!

Saturday, July 3, 2010

Fruit Salad - Revisited


I make fruit salad a lot in the summer as a side dish for whatever we make for dinner that night on the grill.  I seem to use a different combination of fruits each time, but I really enjoyed this combination so I think I will be repeating it quite a bit over the next few months.  This combination of fruit really tastes great, and the different colors look really pretty together!  This made a big bowl of fruit salad that would serve about 6-8 people.

Ingredients:

4 yellow peaches, chopped into bitesize pieces
2 mangos, peeled and chopped into bitesize pieces
2 apples, chopped into bitesize pieces
Juice from half of a lemon
1 small container of raspberries
Small bunch of green, seedless grapes (I used maybe 1/3 of the bag)
Sugar, if your fruit isn't fully ripe

Directions:

First, toss the chopped apples with lemon juice to prevent them from browning.  Next, sprinkle a little sugar over the peaches and mango pieces if they need a little extra sweetness (I bought my fruit the same day I made the fruit salad so I did use a little sugar since the fruit wasn't fully ripened).  Then, mix all the fruit together and serve.  If you are making this ahead of time (which I did), you might want to mix the raspberries in right before serving so that it doesn't turn your other fruit red.

Friday, July 2, 2010

Grilled Corn with Cilantro Lime Butter


This is another grilled side dish that we will be making a ton this summer.  The deliciousness of this recipe completely depends on the deliciousness of the corn you buy, but usually it should be pretty good in the summertime. 

I was growing cilantro out on our deck, but after I started picking stuff off of it it ended up growing all weird so I threw it out.  The cilantro lime butter was delicious, but since I don't have it right out on our deck I will probably use another herb most of the time when we make this unless I buy cilantro for another recipe.  I think that chive butter sounds good so I will probably do that next time.  Anyways, if you haven't grilled corn already, try this out - it's super easy and cheap and you can either make one or two ears per person, depending on how much you like corn.

Ingredients:

4 medium ears of sweet corn, with the silk and husks removed (or however many you want to make)
Foil
1/2 stick of butter, at room temparature (about a tablespoon for each ear of corn you have)
2 tablespoons chopped cilantro
Juice from half of a lime
Salt & pepper, to taste

Directions:

Mix together the butter, cilantro, lime juice, and a little bit of salt & pepper.  Smear the butter mixture all over each ear of corn and wrap in foil. 

Grill over medium heat for about 30 minutes, turning occasionally. 

The possibilities for flavored butter to go with the grilled corn is endless!  Now I just need to buy some of those corn holder things that you stick in each end so that it's not so messy when we eat this :)

Thursday, July 1, 2010

Stuff You Grow Yourself Always Tastes Good!


I noticed today that I had three more tomatoes that were ripe and ready to eat :)  I had already used a few tomatoes recently when I made a caprese salad, and I decided I would make some BLTs for a quick dinner tonight.  I always get super excited when I'm able to use stuff that I grew myself....I just feel like it tastes better than if I had bought the ingredients at the grocery store.  I was also excited because my first gold tomato was ripe and ready.  Aren't these gorgeous?!


Living in Chicago, outdoor space comes at a premium so I just have a small container garden out on my deck.  I have two red tomato plants (they're a patio variety so that the plant stays small and contained in their pots):


I also have one gold tomato plant (and they're also the small, patio variety).  I've never grown gold tomatoes before, but I figured they would look pretty when I used a combination of red and gold together.  You can't really see many of the tomatoes in my picture because this plant is a little bit behind the other two:


I also have a few other pots growing.  Pictured below are my basil, italian parsley, and jalapeno plant (I need to start looking for some good recipes to make sure none of this great stuff goes to waste!).  I also have mint (for mojitos!), chives, and a red pepper plant growing (not pictured).


Even though these aren't edible, I had to throw in a quick picture of one of my beautiful flower planters!  These are growing like crazy and make our deck feel very summery and homey :)


Overall, I'm really happy with how my deck garden turned out this year!  It's not huge, but it's the perfect amount of space for a table & chair set, Kevin's grill & smoker, and my little garden.


Anyways, these BLTs were really good, and I served them with a little fruit on the side.  Make sure to salt and pepper your tomatoes!  I will be making many more tomato recipes in the near future.